Jackfruit Biryani Recipe

Biryani is one of the most appetizing meals loved by everyone. Kathal biryani, also known as Jackfruit Biryani, is a delicious recipe that you must try this summer. To make a delicious and mouth-watering biryani at home, you don’t always need to have chicken or meat in it. In flu seasons, when it is advised not to eat mutton or chicken, jackfruit can be a great substitute as it tastes just like chicken and has a similar texture like both red meat and chicken. Jackfruit Biryani is a perfect combination of meaty vegetable with long grains and fragrant basmati rice. It gets the delectable flavours with a melange of spices and biryani masala. If you love jackfruit, this is the recipe you must try. It is easy-to-make and you can simply pressure cook this biryani recipe. It takes only 40-minutes to prepare this amazing jackfruit biryani. So, unlike other biryanis, you will not have to wait long to savour it. Make this recipe on special occasions like kitty parties and potlucks, and indulge in a flavoursome meal with your loved ones.

For Garnishing

How to make Jackfruit Biryani

  • Step 1 Saute onions with whole spices

    To prepare the delicious jackfruit biryani, place a large pressure cooker on medium flame. Heat 4 tbsp oil and add bay leaf and whole black pepper. Add thinly chopped onion and saute for a minute.

  • Step 2 Add spices and saute until onions are golden brown in colour

    Now, add ginger-garlic paste and saute till onions are golden brown. Add red chilli powder, salt as per taste, and mix well.

  • Step 3 Fry jackfruit in the cooker for 2-3 minutes

    Put jackfruit in the pressure cooker and saute for a minute. Cover lightly and cook for 3 minutes. Stir occasionally.

  • Step 4 Cook jackruit with all the spices and yoghurt

    Add biryani masala, garam masala, turmeric, yoghurt to the cooker and mix well. Cover and let it cook for another 3 minutes. This will help jackfruit to absorb all the flavours and soften.

  • Step 5 Pressure cook the jackfruit with rice

    Now, add the rice, stir to mix well and cook for 3 minutes. Add water and close the lid. Pressure cook on high till 3-4 whistles. Turn off the flame and let the pressure cooker cool.

  • Step 6 Once done, garnish as you like and serve hot

    Open the lid of the pressure cooker once it is at normal temperature and all the steam is out. Take out the kathal biryani and let it cool. Plate the biryani, and garnish with cashews, chopped cilantro and mint leaves. Serve hot with raita and green chutney.


Ricotta and Spinach Ravioli in Tomato Sauce Recipe

Craving for a delicious Italian meal for your special Sunday brunch? Then try this delicious Ricotta and Spinach Ravioli in Tomato Sauce. Tender, beautiful, homemade pasta , stuffed with a creamy mixture of ricotta, spinach, and nutmeg. Served with a simple basil tomato sauce and topped with grated Parmigiano, these ravioli will revive Italian vibes with just one bite. Making this dish at home from scratch ensures that the ingredients are fresh and adulterant free. So, try this classic: Ravioli Ricotta e Spinaci, Ricotta and Spinach Ravioli in Tomato Sauce and enjoy it with your family and friends.

For Filling

For Dough

For Garnishing

For The Main Dish

How to make Ricotta and Spinach Ravioli in Tomato Sauce

  • Step 1 Homemade Pasta Dough

    Making homemade pasta dough is pretty easy and it’s the same for many different pasta shapes. The rule is 1 egg to 100 grams of flour, and that makes enough pasta for 2 people. In this recipe we have used 2 large eggs and 200 grams of flour type 00. While kneading we can add a few drops of water if the dough seems too dry.

  • Step 2 Mix the egg and flour gradually

    On the wooden board, spread the flour, make a hole in the center and add the eggs. Beat the eggs with a fork and start incorporating a little flour. Keep beating the eggs incorporating more of the inner edge of the flour ‘wall’ until the flour starts absorbing the eggs.Once the eggs are blended in the flour, and you have somewhat of a raggedy dough, start working it. Work the dough with your fingertips first to release some moisture. Add a few drops of water if necessary.

  • Step 3 Knead the dough

    Knead vigorously for a few minutes using your whole hand, folding and turning. As soon as the dough is smooth, shape it into a ball, cover it with a cloth or a bowl, or wrap it in plastic, and let it rest for 30 minutes. The gluten will relax and you will have a more elastic dough. While the dough is resting, prepare the filling.

  • Step 4 Make the stuffing

    In a bowl add the ricotta, Parmigiano, and the chopped boiled spinach. TIP: Squeeze the spinach very well before chopping it and adding it to the ricotta. Adjust with salt and grated nutmeg. Mix everything until creamy smooth, taste for seasoning, and set aside.

  • Step 5 Make the pasta

    After the resting time, divide the dough into four parts. Take a piece of dough, and leave the others covered so they do not dry out. Lightly flatten the piece of dough with your hands, pressing it on the floured work surface. Then, turning the handle of the pasta machine, start rolling it, going from the lowest number on the wheel (1) that is the widest roller thickness of the pasta machine, gradually going up one number, until you have a rather thin pasta sheet (5). Pass the sheet a couple of times through the rollers at each number. Since ravioli are made with two overlapping pasta sheets, it is better to have a thin dough.

  • Step 6 Cut the pasta sheet

    When the pasta sheet is at the desired thickness, cut it in half using a knife. On one half add a heaping teaspoon of filling, leaving a space of about 2 fingers in between. Cover with the other half sheet and with your fingers press the dough around the filling to remove as much air as possible. As soon as you have the finished ravioli, it is important to lay them on a large baking sheet with parchment or wax paper, well-floured, so they won’t stick at the bottom. A wood surface dusted with flour to lay your ravioli works great. Let the ravioli dry a little and, if you haven’t made your sauce yet, it’s time to make a simple basil tomato sauce.

  • Step 7 Tomato sauce

    Take a pan and add oil, once the oil is hot enough add minced garlic clove, onion, tomato puree, carrot cook the sauces, add salt and pepper to taste. Lastly add basil leaves and cheese.

  • Step 8 Making the meal

    In a large pot of salted boiling water, place ravioli in delicately. Wait till the ravioli come to the surface, then cook for about 2 minutes longer, about 6-7 minutes total. Take out of water using a slotted spoon and place in a big bowl with some tomato sauce at the bottom. Add more sauce on top, stir gently, then add abundant grated Parmigiano. Place 5-6 ravioli onto a plate and dress with some more sauce and Parmigiano. Ready to serve!

Kakori Kebab Zaitooni Recipe

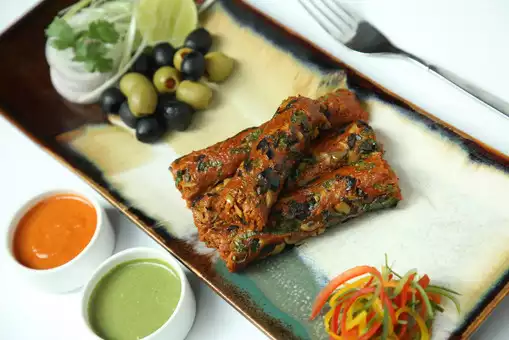
With the chilly winter season here it is the perfect time to indulge in some warming foods like kebabs. Mutton kebabs are a mouth-watering variant of kebabs that you can easily prepare at home by following the below-given recipe. We bring to you an authentic kebab recipe that too by the chef of The Metropolitan Hotel himself. If you are a kebab lover and wish to re-create the restaurant-style experience at home, then this is the perfect recipe for you. Just gather all the ingredients below and get cooking. You can make these kebabs in an oven, grill them over a charcoal grill or even roast them on a non-stick tawa. These melt-in-the-mouth mutton kebabs will surely woo you with their flavours. This Kakori Kebab recipe includes a plethora of spices which are essential to give the kebabs their signature taste. You can make them for a family dinner, an evening party or even for a barbeque party. Do try this recipe, rate it and let us know how it turned out to be.

How to make Kakori Kebab Zaitooni

  • Step 1 Saute the onions

    Heat ghee in a pan. Add sliced onions and saute them until golden-brown in colour and crisp in texture.

  • Step 2 Mix the ingredients

    Now add all the ingredients to a large bowl and mix well to form a mixture or dough. Cover and refrigerate for an hour.

  • Step 3 Cook the kebabs

    About 25 minutes before serving, shape the meat around the skewers and place the kebabs onto a grill over a drip tray or in a pre-heated oven (also on a drip tray). If cooking over a charcoal grill, you will have to keep rotating them so that they are brown and cook evenly. Cook for 15-20 mins at 220 degrees Celsius. Brush with ghee and cook for 2 minutes more.

  • Step 4 Ready to be served

    Once done, garnish with chaat masala onions and lemon and serve with green chutney.
5-Minute Mug Brownie Recipe

Craving for a chocolaty dessert but don’t want to spend hours in the kitchen making one? Here is a super easy 5-minute brownie recipe that you can literally make in a jiffy. You just need a handful of ingredients from the kitchen to make this sinful chocolate brownie. This is a veg brownie recipe and doesn’t even require eggs. To give the brownie a better texture, we have added some chocolate chunks which will make the melted chocolate ooze out, making it almost a choco lava cake. You can increase or decrease the quantity of ingredients in the same ratio, depending on the number of people for whom you are making the cake. Make sure you use a big mug that is microwavable because the batter might rise a bit while baking it and you don’t want the cake to ooze out of the mug. You can make this quick brownie for a low-key birthday, anniversary or even to make your loved one feel special. We haven’t use anything to garnish the cake, but you can definitely decorate it using chocolate syrup, chocolate ganache, chocolate chips, sprinkles, nuts, candied fruits etc. Do try this recipe, rate it and let us know how it turned out to be by leaving a comment in the section below.

How to make 5-Minute Mug Brownie

  • Step 1 Sift the dry ingredients

    Take a large microwavable mug. Through a sieve, sift the dry ingredients like all-purpose flour, powdered sugar, cocoa powder and baking powder.

  • Step 2 Mix in the wet ingredients

    Now add milk and vegetable oil to the cup. Use a fork or a spoon to give a good mix. Now dunk the chocolate pieces into the mug and cover them using the batter.

  • Step 3 Microwave it

    Now microwave the mug for about 3 minutes. Check by inserting a toothpick. If it comes out clean, your brownie is done. If not, then microwave for 1-2 minute more, as per the need.

  • Step 4 Garnish and serve

    Garnish with chocolate sauce (optional) and serve.

Vegan Creamy Spaghetti Recipe
Craving for creamy pasta? Try this Vegan Creamy Spaghetti recipe which is prepared with spaghetti pasta, cashew butter, garlic, red chilli flakes, lemon juice with a hint of sugar and some ghee. This is a luscious meal that can be enjoyed anytime. Be it a kitty party or a picnic, this creamy pasta can be made for any occasion. You can use your favourite seasoning like oregano or dried herbs like thyme and rosemary to accentuate the taste of this dish. Also, if you are a cheese person, you can add vegan parmesan cheese to the pasta to increase the flavour of the dish. (Recipe courtesy:

How to make Vegan Creamy Spaghetti

  • Step 1 Roast paprika and bake for 15 minutes

    Take one red paprika and brush it with light ghee and roast on a frying pan for 10 minutes. You can also bake it at 200 degrees Celsius for 15 minutes. Peel it and then add it to a blender.

  • Step 2 Blend with other ingredients to make a smooth paste

    In the same blender, add garlic, cashew butter, salt, sugar, red chilli flakes and blend them to a smooth paste.

  • Step 3 Heat paprika sauce for 2 minutes

    Add this sauce to a greased frying pan and heat it for 2 minutes. Then add lemon juice to it and mix well.

  • Step 4 Mix boiled spaghetti in the frying pan and toss well

    Add boiled spaghetti to the frying pan and toss it well with the sauce using a tong. Once the spaghetti is cooled enough, enjoy.

Bacon and Eggs Recipe

Bacon and Eggs is a popular and most loves Continental breakfast that is extremely fulfilling and delicious. Bacon and eggs is a simple, easy and wholesome meal that is perfect for a fulfilling meal and one of the best Keto breakfast. Bacon and eggs is a recipe that is really easy to prepare. as we all know that bacon and eggs go very well with each other and it is a protein-rich breakfast recipe. If you don’t feel like preparing an elaborate meal, this is what you ca prepare in just a little time. Follow the simple recipe steps and enjoy this meal with your loved ones. Try now!

How to make Bacon and Eggs

  • Bacon

    Step 1 Pan fry the bacon

    Fry bacon in a pan on medium-low flame until they are crispy. Transfer them into a plate.

  • Step 2 Cook eggs and cherry tomatoes

    Use the same pan to cook eggs. Crack eggs in the pan and cook them as you like; sunny side up. Cover the pan so that the egg cooks properly. Slice cherry tomatoes and cook in the pan at the same time..

    Eggs

  • Step 3 Season the eggs and serve with bacon

    Add seasoning and garnish with chopped fresh parsley. Serve bacon and eggs hot

Kachhe Aam ki Launji Recipe

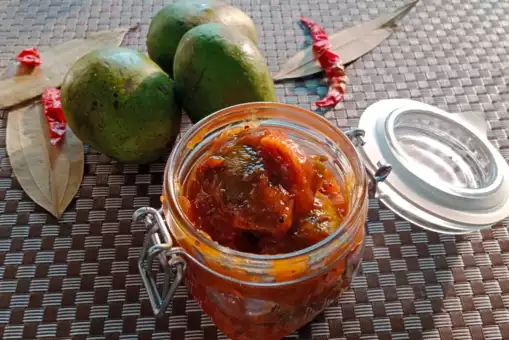
Craving for something sweet and sour with your meals? Try this Kachhe Aam ki Launji that can single-handedly spruce up any kind of meal. Kachhe Aam ki Launji is a seasonal dish and super easy to make at the same time. Do you know that Kachhe Aam ki Launji can be preserved for six months as no additional water is being used? You just need a handful of ingredients like raw mangoes, jaggery, mustard oil, dry red chilli, bay leaf, turmeric, red chilli powder and salt. A special masala that is added to this recipe is Panch Phoron. To make Panch Phoron, just mix 1 teaspoon whole cumin, 1 teaspoon mustard seed, 1 teaspoon fennel seeds, ½ teaspoon onion seeds and 1/3 teaspoon fenugreek seeds. This side dish is most popular in Bihar and Purvanchal. If you too love the tangy flavour of Kacchi Ambi, then you need to try this Kachhe Aam ki Launji at home. Be it kids or adults, everyone will love this recipe for sure. Do try this recipe, rate it and let us know how it turned out to be by leaving a comment in the section below. Happy Cooking!

How to make Kachhe Aam ki Launji

  • Step 1 Prepare the mangoes

    Wash the raw mangoes, peel them and cut into cubes.

  • Step 2 Prepare the tadka

    Pour mustard oil into a pan and put it on heat. Then add 1 teaspoon Panch Phoran. Add 2 bay leaves and 1 dry red chilli. It should be cooked at a smokey temperature for a while to get proper flavour.

  • Step 3 Cook the raw mango

    Add raw mango cubes into the pan. Stir well for at least five minutes so it is sautéed properly. Cover it with a lid and cook for 10 minutes. Remove the lid. By now the mango is half cooked.

  • Step 4 Final preparation

    Add ½ teaspoon turmeric powder, ½ teaspoon red chilli powder and ½ teaspoon salt. Stir it for approx 5 minutes so spices get incorporated. Add crushed jaggery. Mix well, cover it with a lid and let it cook for 5 minutes.

  • Step 5 Ready to be served

    Remove the lid now and the texture will be saucy. Your Kacche Aam ki Launji is ready to be served now.

Green Chilli Fry Recipe

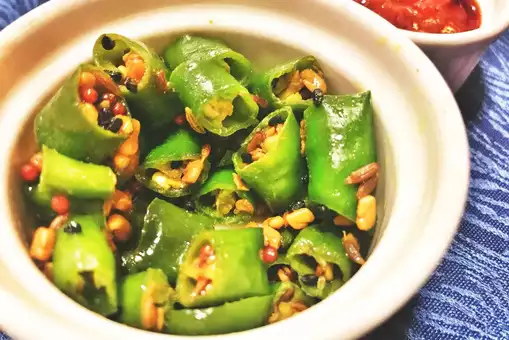
For those who love having super spicy meals, this Green Chilli Fry recipe is perfect for you. If you have kids and elders at home who don’t like spicy food but you can’t do without ‘teekha khana’, then just pair up this Green Chilli Fry with your meals to give them a spicy touch. It is a type of instant pickle that you can even store in the fridge for a week. To make the dish, you need green chillies, cumin seeds, turmeric, asafoetida, coriander powder, dry mango powder, fennel powder, salt and oil. Prepared in less than 10 minutes, this super easy recipe is can be paired with roti sabzi and even dal chawal. This recipe is a perfect balance of spiciness and masalas. To add more flavours to it, you can even experiment by adding some garlic powder, mixed herbs powder, oregano and even chilli flakes. Make sure you store Green Chilli Fry in an airtight container in the fridge. Do try this recipe, rate it and let us know how it turned out to be by leaving a comment in the section below.

How to make Green Chilli Fry

  • Step 1 Cut the green chillies

    Wash the green chillies and pat them dry. Now chop the green chillies into small pieces and collect them in a bowl.

  • Step 2 Prepare the tadka

    Now heat oil in a pan. Add asafoetida, cumin seeds and let them splutter for a minute.

  • Step 3 Add green chillies

    Now add green chillies along with salt. Mix and saute for 10 seconds.

  • Step 4 Add all the spices

    Now add turmeric, coriander powder, dry mango powder and fennel seeds powder. Mix and stir fry the green chillies for 2-3 minutes. Make sure the green chillies are still a bit crunchy.

  • Step 5 Ready to be served

    Your Green Chilli Fry is now ready to be served. Serve them with your dal, roti, sabzi and spice up your meals. Enjoy!

Kairi ki Sabzi Recipe

A delicious dish that will give you both salty and tangy flavours, Kairi ki Sabzi is a speciality of Rajasthani cuisine and the name itself will make your mouth water. This tangy side dish recipe is prepared using raw mangoes, which are known as Kairi in Hindi and are found in abundance in the summer season. An array of flavours are added in this curry with local spices, Kairi ki Sabzi is loved by people on a large scale. The jaggery added in the dish elevates the taste of the dish to another level and gives us a tangy, spicy and sweet experience in each bite. This dish tastes best when paired with hot, fresh rotis and also with boiled rice. You can also serve it as a chutney along with other lentil dishes. Raw mangoes are known to be one of the healthiest fruits that one can consume. they are rich in antioxidants and also provide a different and delicious twist to anything they are added to. All you need to have 30 minutes on your hand to prepare this dish and some raw mangoes. If you are interested in making this raw mango recipe, all you need is to follow the steps given below and make it for your loved ones!

How to make Kairi ki Sabzi

  • Step 1 Cut the mangoes and roast the spices in oil

    Peel the mangoes and cut into cubes. Heat oil in a pan and add cumin seeds, bay leaf, dry red chilli, fennel seeds, fenugreek seeds, onion seeds, cloves and saute for one minute.

  • Step 2 Add jaggery and let it simmer

    Toss in the raw mangoes and add turmeric, red chilli powder and salt. Add jaggery with some water and let it come to a boil. Let it simmer on low flame for 2-3 minutes. Remove from the flame and serve!

Fruit and Yoghurt Parfait Recipe

Parfait is a popular French dessert that not only looks beautiful with all those layers but is also equally delicious. It is a no-cook dessert that will be ready in less than 10 minutes. You just need a handful of ingredients like yoghurt, granola, walnuts, pecans and strawberry. Fruit and Yoghurt Parfait is the perfect dessert that can be served during Christmas parties, New Year parties, Date nights, Anniversaries and other such special occasions. You can customize the dessert as per your own taste by using flavoured yoghurt like mango, blueberry, strawberry, vanilla etc. Fruit and Yoghurt Parfait can be made richer in taste and texture by adding chopped almonds and cashews on top. Be it kids or adults, everyone will love this recipe for sure. Do try this recipe, rate it and let us know how it turned out to be by leaving a comment in the section below. Happy Cooking!

How to make Fruit and Yoghurt Parfait

  • Step 1 Chop the ingredients

    Take walnuts, pecans and strawberries. Chop them into bite-sized pieces.

  • Step 2 Layer the dessert

    Take a dessert cup or glass and start making layers. Add some yoghurt first, then granola, topped with walnuts, pecans and sliced strawberries. Make 3-4 more such layers to complete the dessert.

  • Step 3 Ready to be served

    Your Fruit and Yoghurt Parfait is now ready to be served. Enjoy!

Crunchy Chocolate Recipe

Need something sweet and delicious to make for the upcoming Christmas party? Try this Crunchy Chocolate recipe that you can make with just a handful of dry fruits and nuts along with dark and milk chocolate. Christmas is ruled by cakes and baked goods, but if you are not a pro at baking, then this no-cook recipe is here for your rescue. The addition of dry fruits & nuts like almonds, cashews, raisins, cherries, pistachio and dates will add richness to this chocolate recipe. You can make this chocolate in small chocolate molds or even make a chocolate bar with the mixture. You can add tutti frutti bits to it and even crushed hazelnut for extra flavours. Be it festivals like Christmas and New Year or special occasions like birthdays, anniversaries etc, this Crunchy Chocolate will be the perfect dessert to sweeten the event. This no-fail recipe will be a hit, especially among kids. Do try this recipe, rate it and let us know how it turned out to be by leaving a comment in the section below. Happy Cooking!

How to make Crunchy Chocolate

  • Step 1 Chop the dry fruits and nuts

    Take all dry fruits and nuts. Now chop them into small bits.

  • Step 2 Melt the chocolate

    Take milk chocolate and dark chocolate compound in a bowl. Use the double boiler method to melt the chocolate.

  • Step 3 Make final mixture

    Now mix chopped dry fruits and nuts into this melted mixture.

  • Step 4 Freeze the chocolate

    Take a silicon mold and fill it with the chocolate mixture. Now freeze it for at least two hours.

  • Step 5 Ready to be served

    Once set, your crunchy and tasty Crunchy Chocolate is now ready to be served.

Khajuri Recipe

No festival is complete without devotion and flavourful delicacies, so do Navratri! The nine-day festival which is celebrated to worship the nine avatars of the Goddess Durga with much pomp and show comes with loads of enthusiasm and ecstasy. This scrumptious dessert recipe, Khajuri is all set to satiate your sweet tooth and make all your festivities full of life and ardour. The crispy deep-fried dessert snack is prepared with love using an assortment of ingredients like semolina, refined flour, powdered sugar, milk, and ghee, all put together to give you an experience of sugar rush like never before. Spread the joy of festivals and celebrations with Khajuri and mesmerize all your loved ones with the burst of sweetness on their taste buds. Check out this easy and quick recipe for Khajuri and see how to happiness and flavour quotient shoots up, making everyone go gaga over your magical culinary skills. Coming together in just 15 minutes, this deep-fried palatable dessert recipe is a perfect recipe for not just the festivities, but it adds icing to the cake on numerous occasions and special events as well. Give this delectable dessert snack recipe a shot and we promise you cannot stop yourself indulging in it time and again

How to make Khajuri

  • Step 1 Knead a stiff dough and let it sit for 15-20 minutes

    To make this super scrumptious recipe, combine refined flour, semolina, ghee and salt in a large-sized mixing bowl. Mix the contents nicely and then pour milk to the bowl, followed by sugar. Knead the mixture to make a smooth and stiff dough. You can add more milk as per the requirement. Cover the dough with a damp muslin cloth and give it a resting time of about 15 to 20 minutes. In the meanwhile, start preheating ghee in a deep non-stick frying pan.

  • Step 2 Roll lemon-sized balls out of the dough using your palms

    After the dough is settled down and ready to be used, pull out small portions of the dough and roll it using your palms to make small lemon sized balls. Remember to grease your hands with a little oil so that the dough doesn’t stick to your palms. The shape and size of the balls is completely your choice.

  • Step 3 Deep fry the khajuri balls and let it cool completely

    By now, the ghee should be hot enough ready to deep fry. On a low flame, carefully drop the dough balls into the melted ghee and deep fry until they turn a beautiful golden brown. Let the balls cook through entirely and then place them on an oil-absorbing towel to drain the excess oil. Let them cool completely and store in an air-tight container. Enjoy as and when you want

Creamy Corn Chaat Recipe

This Holi impress your family and guests with this creamy and yummy Corn Chaat. With just a handful of ingredients, you can make a scrumptious chaat for yourself.

Corn Chaat is a common snack that is loved by people of all ages, be it kids or adults. If you often avoid fried and oily snacks, then this Corn Chaat is perfect for you. Loaded with veggies like bell peppers, zucchini, cherry tomatoes and corn, this recipe will be an instant hit. Adding sev as a garnish will add a much-needed crunchy texture to it. Make sure you don’t skip adding garlic mayonnaise to the chaat, as this adds a nice aroma and flavour to the dish. We have added salt, red chilli powder and chilli flakes as seasonings, but you can also add peri-peri and oregano to the dish. This creamy Corn Chaat can also be served with tea or coffee. Kitty parties, picnics or any other ocsssion or gathering is apt for this snack to be served. Do try this recipe, rate it and let us know how it turned out to be by leaving a comment in the section below. Happy Cooking!

How to make Creamy Corn Chaat

  • Step 1 Saute the veggies

    Heat butter in a pan. Add chopped zucchini and red bell pepper. Saute for 1 min on medium flame. Now add corn and roast for another minute.

  • Step 2 Add the seasonings

    Now add red chilli powder, chilli flakes and salt as per taste. Give a good mix.

  • Step 3 Garnish and serve

    Take out the mixture in a bowl. Garnish with cherry tomatoes, lemon, coriander leaves, sev and garlic mayo. Give a toss and serve.

Bacon and Eggs Recipe

Bacon and Eggs is a popular and most loves Continental breakfast that is extremely fulfilling and delicious. Bacon and eggs is a simple, easy and wholesome meal that is perfect for a fulfilling meal and one of the best Keto breakfast. Bacon and eggs is a recipe that is really easy to prepare. as we all know that bacon and eggs go very well with each other and it is a protein-rich breakfast recipe. If you don’t feel like preparing an elaborate meal, this is what you ca prepare in just a little time. Follow the simple recipe steps and enjoy this meal with your loved ones. Try now!


How to make Bacon and Eggs

  • Step 1 Pan fry the bacon

    Fry bacon in a pan on medium-low flame until they are crispy. Transfer them into a plate.

    Bacon

  • Step 2 Cook eggs and cherry tomatoes

    Use the same pan to cook eggs. Crack eggs in the pan and cook them as you like; sunny side up. Cover the pan so that the egg cooks properly. Slice cherry tomatoes and cook in the pan at the same time.

Bacon and Eggs Recipe

Bacon and Eggs is a popular and most loves Continental breakfast that is extremely fulfilling and delicious. Bacon and eggs is a simple, easy and wholesome meal that is perfect for a fulfilling meal and one of the best Keto breakfast. Bacon and eggs is a recipe that is really easy to prepare. as we all know that bacon and eggs go very well with each other and it is a protein-rich breakfast recipe. If you don’t feel like preparing an elaborate meal, this is what you ca prepare in just a little time. Follow the simple recipe steps and enjoy this meal with your loved ones.

How to make Bacon and Eggs

  • Step 1 Pan fry the bacon

    Fry bacon in a pan on medium-low flame until they are crispy. Transfer them into a plate.

    Bacon

  •  Step 2 Cook eggs and cherry tomatoes

    Use the same pan to cook eggs. Crack eggs in the pan and cook them as you like; sunny side up. Cover the pan so that the egg cooks properly. Slice cherry tomatoes and cook in the pan at the same time.Eggs

    • Step 3 Season the eggs and serve with bacon

      Add seasoning and garnish with chopped fresh parsley. Serve bacon and eggs hot.

Rohu Fish Curry Recipe

If you love fish-based dishes, then this recipe will satiate your taste buds in a masaledar manner. This flavourful Rohu Fish Curry recipe is from the state of Bihar. Be it lunch or brunch, this curry recipe can be paired with both rice and chapati. Rohu Fish is the main ingredient of this dish and a number of different spices are also used to flavour it up. A very special masala called Panch Phoran is used in this recipe. If you don’t have readymade Panch Phoran masala, then you can even make it at home. Just mix 1 teaspoon whole cumin, 1 teaspoon mustard seed, 1 teaspoon fennel seeds, ½ teaspoon onion seeds and 1/3 teaspoon fenugreek seeds. Now grind all these spices to make a coarse mixture and use 1 teaspoon of it in the recipe. This yummy fish curry recipe can be served at buffets, family lunches and we assure you that all your guests will love this curry for sure. Do try this recipe, rate it and let us know how it turned out to be by leaving a comment in the section below. Happy Cooking!

How to make Rohu Fish Curry

  • Step 1 Marinate the fish

    Marinate the fish with 1/2 tsp turmeric, 2 tsp garlic paste and salt as per taste. Keep aside in a cool place for half-hour.

  • Step 2 Make a spice masala

    To make the masala, add 1 tsp mustard seeds, 1/4 tsp black pepper, 1/2 tbsp cumin seeds, 1/2 inch ginger piece and 1 tsp garlic paste in a blender. Grind to form a spiced masala. You can also grind the spices in a mortar pestle. Now mix red chilli powder and panch phoran with this mixture.

  • Step 3 Shallow fry the fish

    In a pan, heat mustard oil. Gently place the marinated fish into the pan and shallow fry the fish from both sides. Once fried, take out the fish and place them on a plate.

  • Step 4 Fry the spice masala and tomatoes

    In the same oil, add the spice mixture and fry it for two minutes. Now add tomato paste made using 2 tomatoes and mix well. Let the masala cook until the tomato masala leaves oil. This will take 8-10 minutes.

  • Step 5 Make a gravy by adding water

    Now add 2 cups of water to the pan and bring to a boil. Cook the gravy for 4-5 minutes.

  • Step 6 Add the fish

    Now add the fried fish to the thin gravy along with chopped coriander leaves. Adjust the salt as per taste and cook it for 4-5 minutes more.

  • Step 7 Ready to be served

    Lip-smacking Rohu Fish Curry is now ready to be served. Pair it up with Rice or Chapati and serve.

Tips

  1. If you want, you can even add chopped onions while frying the spice masala and tomatoes.
  2. It is always better to keep the consistency of fish curries a bit watery, as it brings out the flavours in the best way possible.
Chicken Sausage Sandwich Recipe

With just a handful of ingredients, you can make a scrumptious sandwich recipe that is filling and tasty at the same time. Chicken Sausage Sandwich is prepared using baguette, mustard sauce, onion, bell pepper, sausages and olive oil. Baguette is used to make this sandwich, however, you can use regular bread slices if you can’t find a baguette. You can pack these sandwiches for road trips or picnics and even tiffin. Be it kids or adults, everyone will love it for sure. To make the sandwich richer and more flavourful, you can add a cheese slice to it. Adding a slice of lettuce to the sandwich will add a fresh taste to the snack. Within 10-15 minutes, you can make such a delicious snack that will definitely become one of your favourites. Do try this recipe, rate it and let us know how it turned out to be by leaving a comment in the section below. Happy Cooking!

How to make Chicken Sausage Sandwich

  • Step 1 Cook the sausages

    Preheat the grill to medium. On the grill, cook the sausage by turning it occasionally until cooked through. It will take about 10 to 12 minutes. Remove from heat and place on a plate.

  • Step 2 Toast the Baguette

    If desired, toss the Baguette slices on the grill for a few minutes to toast them.

  • Step 3 Saute the onions and bell peppers

    Heat the olive oil in a skillet over very low heat. Add thinly sliced onions and bell peppers and cook slowly for about 15 minutes until the onions are tender and brown.

  • Step 4 Make the sandwich

    Split the sausage in half (lengthwise), so that it forms two thinner pieces of equal length. Place the sausages on one slice of bread. On the other slice, spread mustard sauce. Top the sausage with sauteed bell peppers and onions. Place one bread slice on another to close the sandwich.

  • Step 5 Ready to be served

    Your Chicken Sausage Sandwich is now ready to be served. Enjoy!

Kachumber Salad Recipe

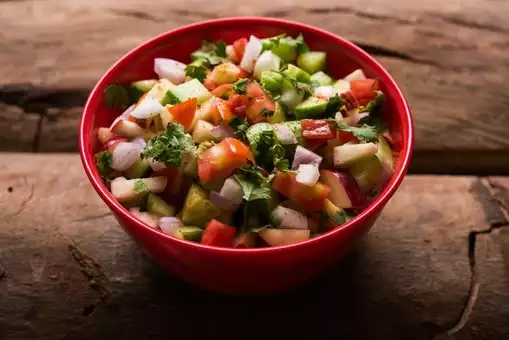
Who said healthy food is always bland and flavourless? Kachumber Salad is a lip-smacking dish made with freshly chopped cucumber, onions, tomatoes, cumin powder, black pepper, black salt, lemon juice and coriander. This is a very easy salad recipe that you can make for everyday use. This Kachumber Salad can be paired with dal, sabzi, curries and even rice-based dishes like pulao and biryani. It is a perfect summer salad that will help to cool you down and refresh your body. The salad looks colourful and gives us a nice tangy flavour. You can also use Kachumber Salad as a filling for sandwiches and wraps as well. Kachumber Salad can also be eaten by those on a weight loss diet, as it contains no oil or butter and just fresh veggies. If you have kids at home, who often make a fuss while eating healthy food, just serve them this delicious salad along with the meal and we bet that they won’t complain. Do try this recipe of Kachumber Salad, rate it and let us know how it turned out to be by leaving a comment in the section below. Happy Cooking

How to make Kachumber Salad

  • Step 1 Mix the ingredients

    In a bowl, add chopped cucumber, onion and tomato. Also add roasted cumin powder, lemon juice and adjust black salt as per taste. Mix the ingredients well.

  • Step 2 Ready to be served

    Transfer the salad to a serving bowl. Garnish the kachumber salad with chopped coriander leaves along with black pepper and serve.

Tips

  1. You can add some chaat masala to add an extra flavour to the salad.
  2. Boiled corn can also be added to give a sweet flavour to the salad.
Thai Steamed Corn Balls Recipe

Looking for something healthy yet delicious at the same time to satiate your hunger pangs in a nutritious manner? Try this Thai Steamed Corn Balls recipe that can be easily made at home in less than 30 minutes. With just a handful of ingredients, you can replicate the Thai flavours efficiently at home by following this step-by-step recipe. Bored of the usual snacks served along with tea? Break the monotony and serve these steamed balls, and we are sure that be it kids or adults, everyone will love it for sure. If you have pakoras every now and then, replace that unhealthy snack with these steamed and healthy Corn Balls. In less than 50 calories per corn ball, this Thai recipe will become one of your favourites. You can serve this unique snack at parties, make it as an evening snack and even pack it in your kid’s tiffin box. Do try this recipe, rate it and let us know how it turned out to be by leaving a comment in the section below. Happy Cooking!

How to make Thai Steamed Corn Balls

  • Step 1 Boil and grind the corn

    Boil the corn in sufficient water for at least 5 minutes. Now drain the water, add the corn to a blender and blend to make a smooth paste. Try to use American corn, if possible.

  • Step 2 Mix all the ingredients

    Take out the corn paste in a bowl. Add coconut milk powder, finely chopped lemongrass, lemon juice, green curry paste, cornflour, baking powder along with salt and pepper as per taste. Mix all the ingredients together to make a smooth mixture.

  • Step 3 Make corn balls

    Now scoop out small portions from the mixture and gently roll them between your hands to make small balls. Place all these balls on a plate.

  • Step 4 Steam the balls

    Place all the balls in a steamer and steam them for 10-12 minutes.

  • Step 5 Ready to be served

    Your Thai Steamed Corn Balls are now ready to be served. Pair up with a dip of your choice and enjoy.

At Jalsa Kolkata, culinary innovation meets Bengali tradition

It was a rainy evening, and my childhood friend Rupkatha and I had planned for a sophisticated night out. Just two girls from a tiny town, acting all fancy in the big city.

As we stepped into Jalsa, Rupu and I were instantly captivated by the fusion of modernity and tradition that defines this new Bengali gem in the heart of Kolkata. The black-and-white patterned tiles on the floor, the elegant chandeliers, and the vibrant pops of color accentuating the moody walls set the stage for a chic dining experience. Jalsa, brought to us by the minds behind PDT and Soba Sassy, had been on my must-visit list for a while, and the anticipation was palpable.

It’s true what they say, that sometimes the best things are worth the wait. Jalsa met our expectations and surpassed them. Rupkatha, a serious corporate lawyer and a true foodie, was equally delighted by the experience. We were about to embark on a special culinary journey.

Jalsa’s forte lies in its ability to infuse an unmistakable Indian essence into every aspect of its offerings, from the decor to the food and drinks. The beverage menu alone left us in awe, with ingredients like kahwa, marigold, and turmeric finding their way into enticing concoctions.

We decided to fully immerse ourselves in the experience by opting for the tasting menu, a choice that I believe is a first in Kolkata. It’s a brilliant way to explore the diverse flavours and culinary artistry that Jalsa has to offer.

Now, let’s get to the good stuff – the food. The journey kicked off with Avo Cornetto, guacamole served in a delightful charcoal cornetto. The plating was simply marvellous, as the dish looked looked like little guac icecreams suspended on an acrylic plate.

The Mango Tequila Bhetki came next, with the bhetki fish expertly prepared in a mango salsa and given a delightful tequila twist. The tangy notes were a perfect ode to the summer season.

Next up were the Phulka Laal Maas Tacos, where Mathania chillies infused a slow-cooked mutton with fiery flavor. Served like a tostada, these single serves are a genius addition to the tasting menu. The presentation, too, was a feast for the eyes, with platters and service bowls crafted in ceramic or slate, adding an artistic dimension to every dish.

But what truly stole our hearts were the Kaali Jalebi Caviar. I couldn’t help but raise an eyebrow at the thought of ‘rabri’ with caviar, especially for dessert. However, my skepticism was promptly quelled. As I dug into what appeared to be black pearls resting alongside saffron ‘esfuma’ and a dollop of ‘rabri,’ the unexpected happened. The pearls, surprisingly crunchy, burst with the unmistakable taste of ‘jalebi.’ It was an exquisite delight, with activated charcoal masking the cardamom-flavored Jalebi pearls. The clever use of ‘espuma’ (foam in Spanish) added a unique touch to the dish without resorting to non-vegetarian emulsifiers.

But Jalsa doesn’t just end with its innovative desserts. It finishes in quintessential Bengali style – with paan. This is what I won’t explain. You have to try to believe.

It’s important to note here that Rupu was five-months pregnant at the time and had her cravings justly satisfied with a meal long due.In a city renowned for its diversity, Jalsa stands out as a creative energy, preserving the essence of Bengali flavours while pushing the boundaries of culinary art.